So it’s obviously been longer than a month since our last
entry. Well life has a schedule of its
own that doesn’t always accommodate pledges.
At this point what I’ll be doing is posting when I can and trying to
keep to once a month when possible.
Working Smarter Not harder
That said the topic of this post is making the most of your
hobby time. As more and more things pop
up I find my hobby time tends to be sporadic.
The problem there is as I spend time doing working here and there I’m not
sure I am getting the most out of my time.
An argument might be this is a hobby and any time I spend on the hobby I
enjoy is time well spent. While that
might be true I feel I get more enjoyment out of my hobby if I’m working
towards accomplishing specific goals. In
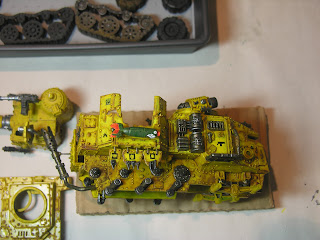
this case I have had my Ork Battle Wagon on the table for quite some time and
each time I pick it up to paint here and there I feel like I’m not working in
the most efficient way possible.
I began thinking if I
mapped out what I wanted to do I believe I could progress through my projects
with some better sense of where I am and feel like I am getting more out of my
time. If I’m not getting regular time to
work on my hobby then it makes all the more sense to record what I am doing so
when I get time I know exactly what I did and what I wanted to do next. When I pick up a project after not having
worked on it in a while I may not remember where I was, so a good amount of
time is spent just trying to figure what I was doing and where I should pick
up. I want to avoid that in future.
To address this issue
I created some short forms to help my track things. One I call the Paint Post which is a sheet I
use to summarize the various stages of a project.
The other form I call bench notes which are
basically memo pads. The system I have
created is I basically track the whole project on the paint post and add bench
notes to the project as I plan my next stage of work. In the example here I decided to finish the
right side of the wagon.
I also took
some pictures beforehand so I could check my progress during a session and
after I was done. My Nikon has a fixed
lens so my ability to get in close is limited.
However something is better than nothing. In this case I identified what I felt still
needed to be done on the right side of the wagon wrote it up and set to
work.
In particular and wanted to do some weathering on the side
of the wagon and get some rust and paint chipping on. I had done some weathering on parts of the
wagon already but honestly that was hit and miss I mainly used a technique of
trying to paint some random shapes in a dark base and then add metal color
inside to create a look of rust and paint chipping away to show the bare metal underneath. In some cases the sections I painted didn’t
feel natural, so I wanted to try something on the right side where I had done no
weathering to see if I could finalize what method I wanted to use on the rest
of the wagon. When it comes to
weathering there are a few approaches to take like the classic hair spray technique there is also the sponge method which is used either directly or with
masking fluid and salt weathering.
Personally I prefer the sponge technique although I will be trying salt
and masking fluid in the near future. I like make up sponges for this in particular latex. They have good body and can be ripped to create different sizes and have a more jagged profile to get that random pattern that looks better.
 Here you can see my shots after I completed my goals. The difference shows up best between the 2nd Pre-session shot 2nd Post-session and The weathering is subtle and that’s what I like, I emphasize
more of an all-around dirty dusty look.
I’m happy with this method of planning my work, I can tell you it took
two sessions to get this done and I’m planning on working on the back and the
cargo area next. I also wanted to add some shadow detail to the metal canisters and pick out some other detail areas I thought might need a little touching up.
After its all said and done I have a better grasp
of what I did and a better sense of accomplishment. I think that will also spring board me to painting
more often since I have a better idea of what’s getting done. In this hobby you can have a lot of things to
do and in some ways it can become discouraging if you don’t feel you’re making
progress.


